Load Data to Snowflake
Snowflake makes it easy to play with your data. Once data is in the warehouse, you can perform all kinds of analysis.
The tricky part is getting data INTO the warehouse.
Picture it: A CSV file sits on your laptop. You need to get it into Snowflake.
But how?
Today, you're living the week of a data engineer. Files will be delivered to your computer each day. And your job is to get the files into Snowflake.
Grab your keyboard and let's go!
Set Up
To keep things simple, the CSV file is small: 6 columns and 5 rows.
| visit_id | patient_id | visit_date | department | visit_cost | is_emergency |
|---|---|---|---|---|---|
| V1001 | P001 | 2026-01-01 | Cardiology | 450.75 | false |
| V1002 | P002 | 2026-01-01 | Neurology | 1200.00 | true |
| V1003 | P003 | 2026-01-01 | Pediatrics | 200.00 | false |
| V1004 | P004 | 2026-01-01 | Orthopedics | 875.50 | false |
| V1005 | P005 | 2026-01-01 | Oncology | 1500.00 | true |
The data represents patient visits at a hospital on one day. The application team says you'll get a new file each day.
On the Snowflake side, there's a table that will receive the records from the CSV file. It's created like this:
CREATE OR REPLACE TABLE demo.public.patient_visits (
    visit_id       STRING NOT NULL,
    patient_id     STRING NOT NULL,
    visit_date     DATE NOT NULL,
    department     STRING NOT NULL,
    visit_cost     NUMBER(10,2) NOT NULL,
    is_emergency   BOOLEAN NOT NULL
);
Alright, you have the source (CSV file on your laptop) and the destination (the Snowflake table).
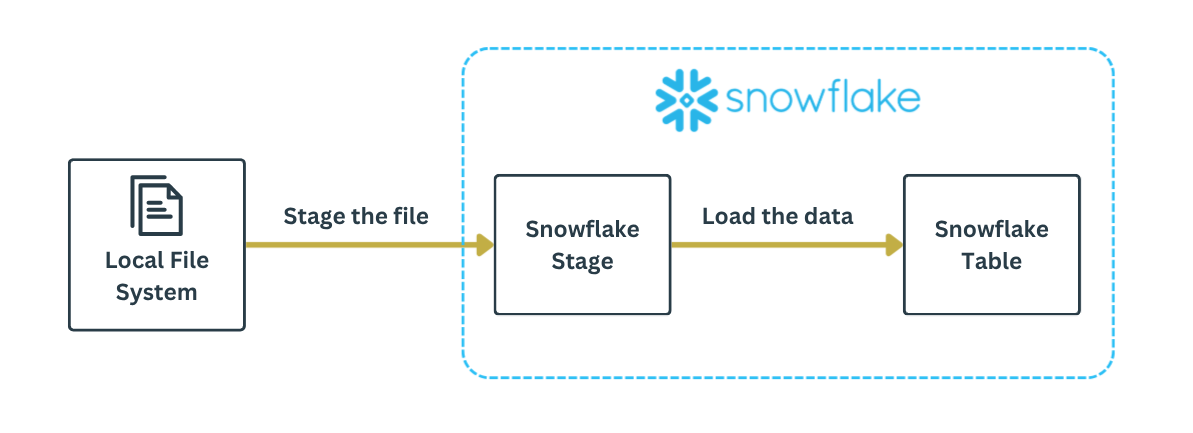
Before you can transfer the file contents into a Snowflake table, you need to stage the file. Think of a stage as a waiting zone of files. Once the file is staged, the data within the file can be loaded into the Snowflake table.
Keep this in mind. Get some sleep. Tomorrow we're going loading.
Day 1
Good morning! The first file is here: patient_visit_2026_01_01.csv
Step 1: Get the file from your laptop to a Snowflake stage.
On your laptop, the file is located in the /tmp/ folder.
On Snowflake, the target is a "user stage." We'll talk more about stages later. Fow now, assume the path @~/visits/ somehow points to a storage location in Snowflake.
In the interactive Snowflake CLI, you enter a PUT command:
 > PUT file:///tmp/patient_visit_2026_01_01.csv @~/visits/;
+-----------------------------------------------------------------------------------------------------------------------------------------------------------+
| source                       | target                          | source_size | target_size | source_compression | target_compression | status   | message |
|------------------------------+---------------------------------+-------------+-------------+--------------------+--------------------+----------+---------|
| patient_visit_2026_01_01.csv | patient_visit_2026_01_01.csv.gz | 294         | 224         | NONE               | GZIP               | UPLOADED |         |
+-----------------------------------------------------------------------------------------------------------------------------------------------------------+
Ta-da! Step 1 is done. The command copied the file to Snowflake's storage. Note how the file was automatically compressed via GZIP.
You can verify the file exists in the user stage by running a LIST command:
 > LIST @~;
+------------------------------------------------------------------------------------------------------------------+
| name                                   | size | md5                              | last_modified                 |
|----------------------------------------+------+----------------------------------+-------------------------------|
| visits/patient_visit_2026_01_01.csv.gz | 224  | 5f581b13cf09f98fe17161f485e1d19a | Fri, 16 Jan 2026 17:59:45 GMT |
+------------------------------------------------------------------------------------------------------------------+
Step 2: Transfer the file contents into the Snowflake table.
You want to copy data into a table called patient_visits from all files that are in the user stage's visits/ folder. You declare that with a COPY INTO command in Snowsight:
COPY INTO demo.public.patient_visits  -- destination: snowflake table
FROM @~/visits/                       -- source: user stage, visits folder
FILE_FORMAT = (
    TYPE = CSV
    SKIP_HEADER = 1
);
The results instantly show all 5 rows were loaded:

If everything went well, you can query the table and verify the data made it.
 > SELECT * FROM demo.public.patient_visits;
+------------------------------------------------------------------------------+
| VISIT_ID | PATIENT_ID | VISIT_DATE | DEPARTMENT  | VISIT_COST | IS_EMERGENCY |
|----------+------------+------------+-------------+------------+--------------|
| V1001    | P001       | 2026-01-01 | Cardiology  | 450.75     | False        |
| V1002    | P002       | 2026-01-01 | Neurology   | 1200.00    | True         |
| V1003    | P003       | 2026-01-01 | Pediatrics  | 200.00     | False        |
| V1004    | P004       | 2026-01-01 | Orthopedics | 875.50     | False        |
| V1005    | P005       | 2026-01-01 | Oncology    | 1500.00    | True         |
+------------------------------------------------------------------------------+
Yay! You did it. Go get a donut from the break room.
Day 2
The second file just arrived: patient_visit_2026_01_02.csv
| visit_id | patient_id | visit_date | department | visit_cost | is_emergency |
|---|---|---|---|---|---|
| V1006 | P006 | 2026-01-02 | Emergency | 980.25 | true |
| V1007 | P002 | 2026-01-02 | Cardiology | 300.00 | false |
| V1008 | P007 | 2026-01-02 | Dermatology | 150.00 | false |
| V1009 | P008 | 2026-01-02 | Pediatrics | 0.00 | false |
| V1010 | P009 | 2026-01-02 | Neurology | 2200.99 | true |
Here we go again! Stage the file:
 > PUT file:///tmp/patient_visit_2026_01_02.csv @~/visits/;
+-----------------------------------------------------------------------------------------------------------------------------------------------------------+
| source                       | target                          | source_size | target_size | source_compression | target_compression | status   | message |
|------------------------------+---------------------------------+-------------+-------------+--------------------+--------------------+----------+---------|
| patient_visit_2026_01_02.csv | patient_visit_2026_01_02.csv.gz | 292         | 224         | NONE               | GZIP               | UPLOADED |         |
+-----------------------------------------------------------------------------------------------------------------------------------------------------------+

 > LIST @~;
+------------------------------------------------------------------------------------------------------------------+
| name                                   | size | md5                              | last_modified                 |
|----------------------------------------+------+----------------------------------+-------------------------------|
| visits/patient_visit_2026_01_01.csv.gz | 224  | 5f581b13cf09f98fe17161f485e1d19a | Fri, 16 Jan 2026 17:59:45 GMT |
| visits/patient_visit_2026_01_02.csv.gz | 224  | 2e08eed8b397389b18cad2d041655e07 | Fri, 16 Jan 2026 22:09:51 GMT |
+------------------------------------------------------------------------------------------------------------------+
Both files are now in Snowflake's user stage.
Time for another COPY INTO:
COPY INTO demo.public.patient_visits
FROM @~/visits/
FILE_FORMAT = (
    TYPE = CSV
    SKIP_HEADER = 1
);

You're done!
Let's slow down here. Check out the FROM clause of the COPY INTO statement. You told Snowflake to grab all files located in @~/visits/ and push the content into the patient_visits table.
But look at the query output; only ONE file was loaded, the new file from January 2. Snowflake's smart enough to know which files in the stage have been loaded and which ones have not. After evaluating the FROM clause, Snowflake processes only new files by default. That's nice.
Oh yeah, did you notice that FILE_FORMAT line in the COPY INTO statement? That's where you tell Snowflake what the file looks like, so it knows how to interpret the file. Here you declare the staged file is a CSV file (TYPE = CSV). With SKIP_HEADER = 1, you tell Snowflake to skip the first line of the file; the first line gives the column names and doesn't need to be loaded.
This minimal file format works until...
Day 3
A new day, a new file: patient_visit_2026_01_03.csv
| visit_id | patient_id | visit_date | department | visit_cost | is_emergency | insurance_provider |
|---|---|---|---|---|---|---|
| V1011 | P010 | 2026-01-03 | Cardiology | 500.00 | false | Gretna |
| V1012 | P011 | 2026-01-03 | Oncology | not_available | true | GreenCross |
| V1013 | P012 | 2026-01-03 | Emergency | 750.25 | yes | Divided |
| V1014 | P013 | 2026-13-14 | Pediatrics | 300.00 | false | Digna |
| V1015 | P014 | 2026-01-03 | 450.00 | false |
Notice anything off? Let's see what happens.
Stage the file:
> PUT file:///tmp/patient_visit_2026_01_03.csv @~/visits/;
Load the new file:
COPY INTO demo.public.patient_visits
FROM @~/visits/
FILE_FORMAT = (
    TYPE = CSV
    SKIP_HEADER = 1
);

Uh what? Welcome to a real day, buttercup.
This 3rd file is mucked up. There's a new column insurance_provider. Snowflake's screaming because the column counts between the Snowflake table and the CSV file don't match. Try doing what the error recommends: use ERROR_ON_COLUMN_COUNT_MISMATCH in the FILE_FORMAT.
This setting is set to True by default, so Snowflake normally stops the load process if the number of columns do not match. But when the setting is False, mismatched column counts do not raise an error. Instead, any extra columns are not loaded. Give it a whirl:
COPY INTO demo.public.patient_visits
FROM @~
FILE_FORMAT = (
    TYPE = CSV
    SKIP_HEADER = 1
    ERROR_ON_COLUMN_COUNT_MISMATCH = FALSE -- don't stop if columns don't match
);

Good news: You got past the differing column count issue.
Bad news: Now you have more gobbledegook to decipher. Looks like an extra column isn't the only issue with this file.
At this point, you're going to burn the afternoon repeatedly trying COPY INTO until the file issues are resolved. It'd be nice if you can see ALL file issues before loading the data. If only there was something...
There is! Enter "validation mode." In validation mode, Snowflake does not insert records into the table. Instead it parses the files to see if there are any issues. Simply add the VALIDATION_MODE parameter to the COPY INTO statement, and ask to see the errors:
COPY INTO demo.public.patient_visits
FROM @~
FILE_FORMAT = (
    TYPE = CSV
    SKIP_HEADER = 1
    ERROR_ON_COLUMN_COUNT_MISMATCH = FALSE
)
VALIDATION_MODE = RETURN_ERRORS; -- show errors in files
Look at the feedback!

The output declares 4 errors clearly. It tells which line each error occurs on. If you scroll to the right in Snowsight, the output even shows the column creating the error.
Now you know what to do. You can fix the 4 errors in the CSV file, stage the corrected file, and load into the table again. Hooray! I'll leave that to you; I'm getting more donuts.
This fiasco is common for incremental data loads (where someone sends you new files regularly). The initial data loads are typically flawless. Eventually though, the source application team will change the schema by adding a column. Occasionally, bad data will be delivered. Thankfully, Snowflake's COPY INTO statement has features to debug and resolve such issues.
Clean Up
Remember you transferred CSV files from your laptop to Snowflake's user stage.
 > LIST @~;
+------------------------------------------------------------------------------------------------------------------+
| name                                   | size | md5                              | last_modified                 |
|----------------------------------------+------+----------------------------------+-------------------------------|
| visits/patient_visit_2026_01_01.csv.gz | 224  | 56a3b8d31018b934449ffb434914f1d3 | Mon, 19 Jan 2026 21:47:55 GMT |
| visits/patient_visit_2026_01_02.csv.gz | 224  | fc87666fb24249a9aec9ed2800c63a90 | Mon, 19 Jan 2026 21:48:37 GMT |
| visits/patient_visit_2026_01_03.csv.gz | 256  | 0c6e8fe7e792e7be93fd58fdc3f30977 | Mon, 19 Jan 2026 21:49:01 GMT |
+------------------------------------------------------------------------------------------------------------------+
The files contribute to Snowflake storage costs. For these small example files, the cost is negligible. But for production environments with several GB of data, you'd want to remove the files once you're done with them. You remove them with the REMOVE command:
 > REMOVE @~;
+--------------------------------------------------+
| name                                   | result  |
|----------------------------------------+---------|
| visits/patient_visit_2026_01_01.csv.gz | removed |
| visits/patient_visit_2026_01_02.csv.gz | removed |
| visits/patient_visit_2026_01_03.csv.gz | removed |
+--------------------------------------------------+
A more automated approach is to include the PURGE = TRUE option when running COPY INTO. This setting tells Snowflake to remove files after loading. That way, you don't have to remember to go back and clear the stage.
COPY INTO demo.public.patient_visits
FROM @~
FILE_FORMAT = (
    TYPE = CSV
    SKIP_HEADER = 1
    ERROR_ON_COLUMN_COUNT_MISMATCH = FALSE
)
PURGE = TRUE; -- remove files from stage after loading
Wait, what's a stage again?
A stage is where the files are stored for loading and unloading. It's the area where data lives before being loaded into a Snowflake table. It's also where data lands after being unloaded from a Snowflake table.
There are two groups of stages: internal and external. The difference is in the name.
With an internal stage, files are stored within Snowflake. In the world of internal stages, there are 3 types:
- User stage: every user has their own private user stage, accessible via the path
@~. - Table stage: every table has its own stage to store supporting files, accessible via the path
@%<name-of-table>. - Named internal stage: these stages are like a user stage, but available to multiple users. They are accessed via the path
@<name-of-stage>.
An external stage on the other hand is... external to Snowflake. The files are not stored in Snowflake but somewhere else like AWS S3 or Azure Blob Storage. You'd want to use an external stage when you already store files in external cloud storage. External stages are especially helpful when you want to load massive amounts of data, especially if you're already using S3 as a data lake.
Not bad, buttercup. You made it through a few days of data engineering. Now that the data's available in Snowflake, those analysts can work their magic.
Data can be loaded into Snowflake in multiple ways. We've just looked at one approach. In general though, getting data into Snowflake is a two-step process: stage and load. Remembering that can get you pretty far.
Do you need help getting your data into Snowflake? Call me. I'm ready to take the stage.