Snowflake with Terraform
It's a lot of fun to develop a new project in Snowflake. On the cloud platform, you can quickly spin up databases and virtual compute with the click of a button. What's not fun is the unexpected bill that comes at the end of the month. When developing proof-of-concepts, these costs can be drastically reduced by simply destroying the Snowflake resources when you're not using them. In an ideal world, you spend the day working in Snowflake; at the end of the day, you quickly tear down what you built to avoid storage and compute costs overnight. In an even more ideal world, you wake up the next day, re-provision your cloud resources, and continue your work. In this ideal world, you have Terraform.
Terraform is an Infrastructure-As-Code (IaC) solution for managing cloud resources. That's a fancy way of saying that you use programming to create stuff in the cloud instead of using the traditional click-and-type steps in a user interface. Terraform lets you declare what you want in the cloud (the target state) and keeps a log of what's actually in the cloud (the current state). The Terraform executable then attempts to create, modify, and delete cloud resources to make the current state match the target state.
On a recent data engineering project, I used Snowflake as a data warehouse. The setup included a database, three schemas, and a service user that could be used to manage data objects within the database. Below is a brief description of how you can use Terraform to provision a basic data warehouse.
Setup
1. Create Snowflake Account
First thing's first: You need a Snowflake account. If you don't have one, you can start a free trial here: https://signup.snowflake.com/.
Next, we need to identify a user in the Snowflake account that Terraform will impersonate when managing Snowflake resources. It's helpful for this user to have the ACCOUNTADMIN role. By default, the user that creates the Snowflake account should have the ACCOUNTADMIN role.
For this tutorial, we can allow Terraform to authenticate in Snowflake via username and password. (Other methods of authentication can be found here). On your local computer, create a configuration file ~/.snowflake/config that contains Snowflake credentials for the user with the ACCOUNTADMIN role:
# ~/.snowflake/config
[default]
account='<snowflake-account-identifier>'
user='<user-name>'
password='<user-password>'
role='ACCOUNTADMIN'
Replace this template with the account identifier and user credentials in your scenario. Terraform will use this "default" profile to connect to your Snowflake account.
2. Install Terraform
Next, to use Terraform, you gotta get Terraform: https://developer.hashicorp.com/terraform/install
Terraform is bundled as a compiled binary package that can run on your local machine. Download the package for your operating system. We'll use Terraform from a terminal, so the Terraform executable must be in your terminal's PATH variable. You can verify your installation was successful by running the command terraform -help.
3. Download Repo
The "IaC" part of Terraform is a collection of text files that define cloud resources in the Terraform language. The code for this walkthrough can be downloaded from this Github repo. We'll walk through the Terraform configuration within these files and modify variables as we go.
Explanation of Repo
Alright, let's talk about the Terraform configuration files. Here's the full directory:
├── main.tf
├── outputs.tf
├── variables.tf
├── modules
│   └── snowflake
│       ├── main.tf
│       ├── outputs.tf
└       └── variables.tf
We'll first look at the files in the root directory and then we'll check out what's in the ./modules/snowflake subdirectory.
The standard module structure of Terraform has a root module containing three files: main.tf, variables.tf, and outputs.tf. The root directory's main.tf file serves as the entry point for the Terraform configuration. It lists the required providers and modules that will be maintained by the repo. In this case, we define the snowflake provider sourced from Snowflake-Labs/snowflake and specify a local backend. The local backend simply states that the "status" of the current cloud resources is stored on your local machine. For small projects like this, you can store the backend on your local machine. For production environments, it's best to use Terraform Cloud to manage the backend, especially when collaborating with other developers.
# main.tf
terraform {
  required_providers {
    snowflake = {
      source  = "Snowflake-Labs/snowflake"
      version = "~> 0.86"
    }
  }

  backend "local" {}
}

module "snowflake" {
  source = "./modules/snowflake"

  service_user_password = var.snowflake_service_user_password
}
The root main.tf file also lists modules that are loaded into the configuration. Modules are a great way to group resources that are used together; they can be also be used to package and reuse Terraform configurations between projects. We have one module called "snowflake" which expects a variable for the service user's password. The password value is passed to the Terraform executable at runtime as an environment variable to avoid committing the password to the code's repository. The variable is declared in the variables.tf file. The password can be written in the file .env with the prefix TF_VAR_. Terraform will read environment variables with this prefix and load them to any variables defined in the Terraform configuration files... which brings us to another point; you need to create an .env file in the root directory that defines the password of your service user:
# .env
export TF_VAR_snowflake_service_user_password=<enter-your-password>
Next, let's look at the files within the snowflake module. In ./modules/snowflake/variables.tf, we define two variables:
snowflake_profile: the Snowflake configuration profile name (with "default" as the default value). The value you use should match the profile name you set up in~/.snowflake/configabove.service_user_password: the password for the service user. When creating the service user, Terraform will ensure the user has this password.
The module's main.tf file configures the provider to use our local Snowflake profile and then defines the cloud resources to provision. As you scroll through the rest of the file, you'll see several blocks that describe the Snowflake database, schemas, virtual warehouse, service user, and service role. You'll also see blocks defining privileges so the service role can actually use the database, schemas, tables, etc.
# ./modules/snowflake/main.tf
terraform {
  required_providers {
    snowflake = {
      source  = "Snowflake-Labs/snowflake"
      version = "~> 0.86"
    }
  }
}

provider "snowflake" {
  profile = var.snowflake_profile
}

# ... cloud resources defined below ...
Let's talk briefly about dependency management. As you may expect, the order in which you create Snowflake objects matters. For example, you need to create a database before you try creating a schema within that database. Terraform handles such dependencies implicitly through the use of references to other resources. For example, referencing the database name by the Terraform resource handler instead of a hard-coded database name informs the Terraform engine that the schema requires the database to be available first:
# ./modules/snowflake/main.tf
# ...
resource "snowflake_database" "hogwarts_db" {
  name                        = "HOGWARTS"
  data_retention_time_in_days = 0
}

resource "snowflake_schema" "raw" {
  database            = snowflake_database.hogwarts_db.name  # use resource handler instead of hard-coded "HOGWARTS"
  name                = "RAW"
  data_retention_days = 0
}
# ...
When Terraform sees such dependencies, the Terraform executable will ensure resources are created in the proper order. Conversely, if you use hard-coded string values to reference the database your schema resides in, you may receive an error saying something like "schema cannot be created because database does not exist." Similar dependencies ensure that a user is created after the creation of the warehouse the user accesses and the role the user assumes.
Lastly, the module has an output file ./modules/snowflake/outputs.tf that does what's perhaps obvious: it declares the module's output variables.
# ./modules/snowflake/outputs.tf
output "snowflake_warehouse_name" {
  value = snowflake_warehouse.hogwarts_wh.name
}

output "snowflake_service_user_username" {
  value = snowflake_user.svc_hogwarts.name
}
These output variables can then be used by other modules. For example, you may want to use the Snowflake warehouse name and service user name in another module that manages AWS resources, like AWS Glue for pipelines that deliver data to Snowflake via the service user.
Enough talk, I wanna see some action
It's time to use Terraform to create Snowflake resources. Within the root Terraform directory, execute the following command to load the environment variables:
source .env. This will load the Snowflake service user password into the environment. Remember, we don't want to commit the hard-coded password into the codebase.
Next we need to initialize the Terraform project. Run the command terraform init to download the required dependencies for managing Snowflake resources.
Then execute the following command to create the Snowflake resources:
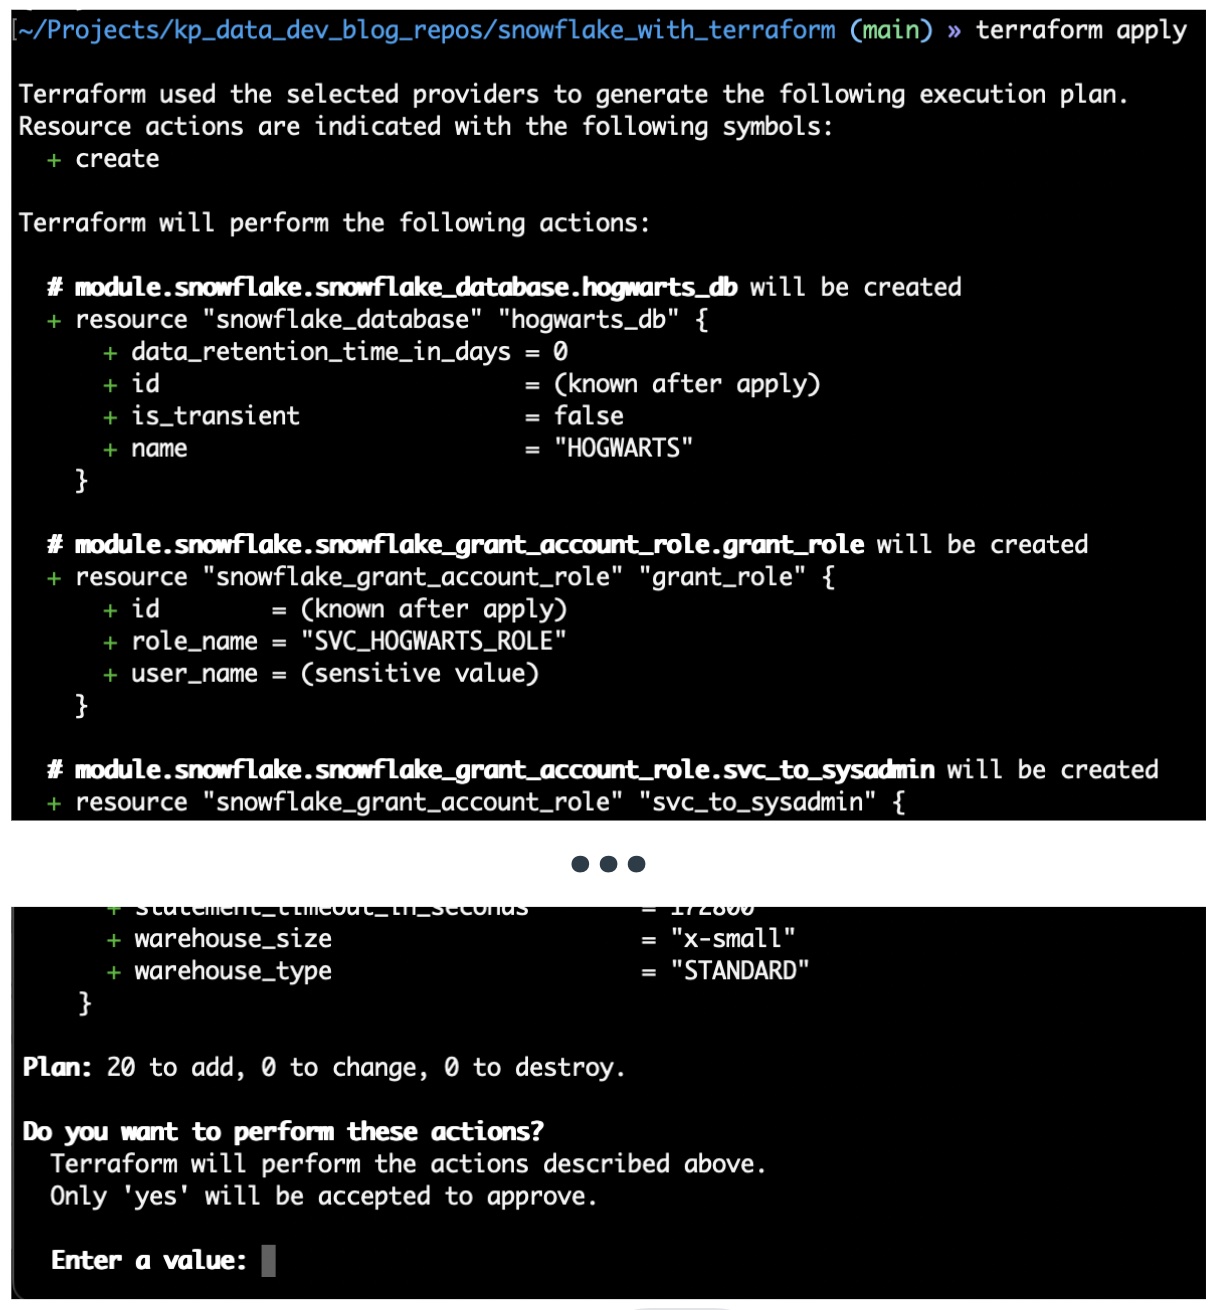
terraform apply.

Behind the scenes, the Terraform executable parses the files in the directory to see what you want in Snowflake; it will then use the credentials defined the configuration file ~/.snowflake/config to access Snowflake's API and see what is currently within your Snowflake account. The CLI will present a summary of resources to be provisioned and give a prompt asking for permission to make changes. Type "yes" and hit "enter"; this will tell the Terraform executable to provision the outlined resources.
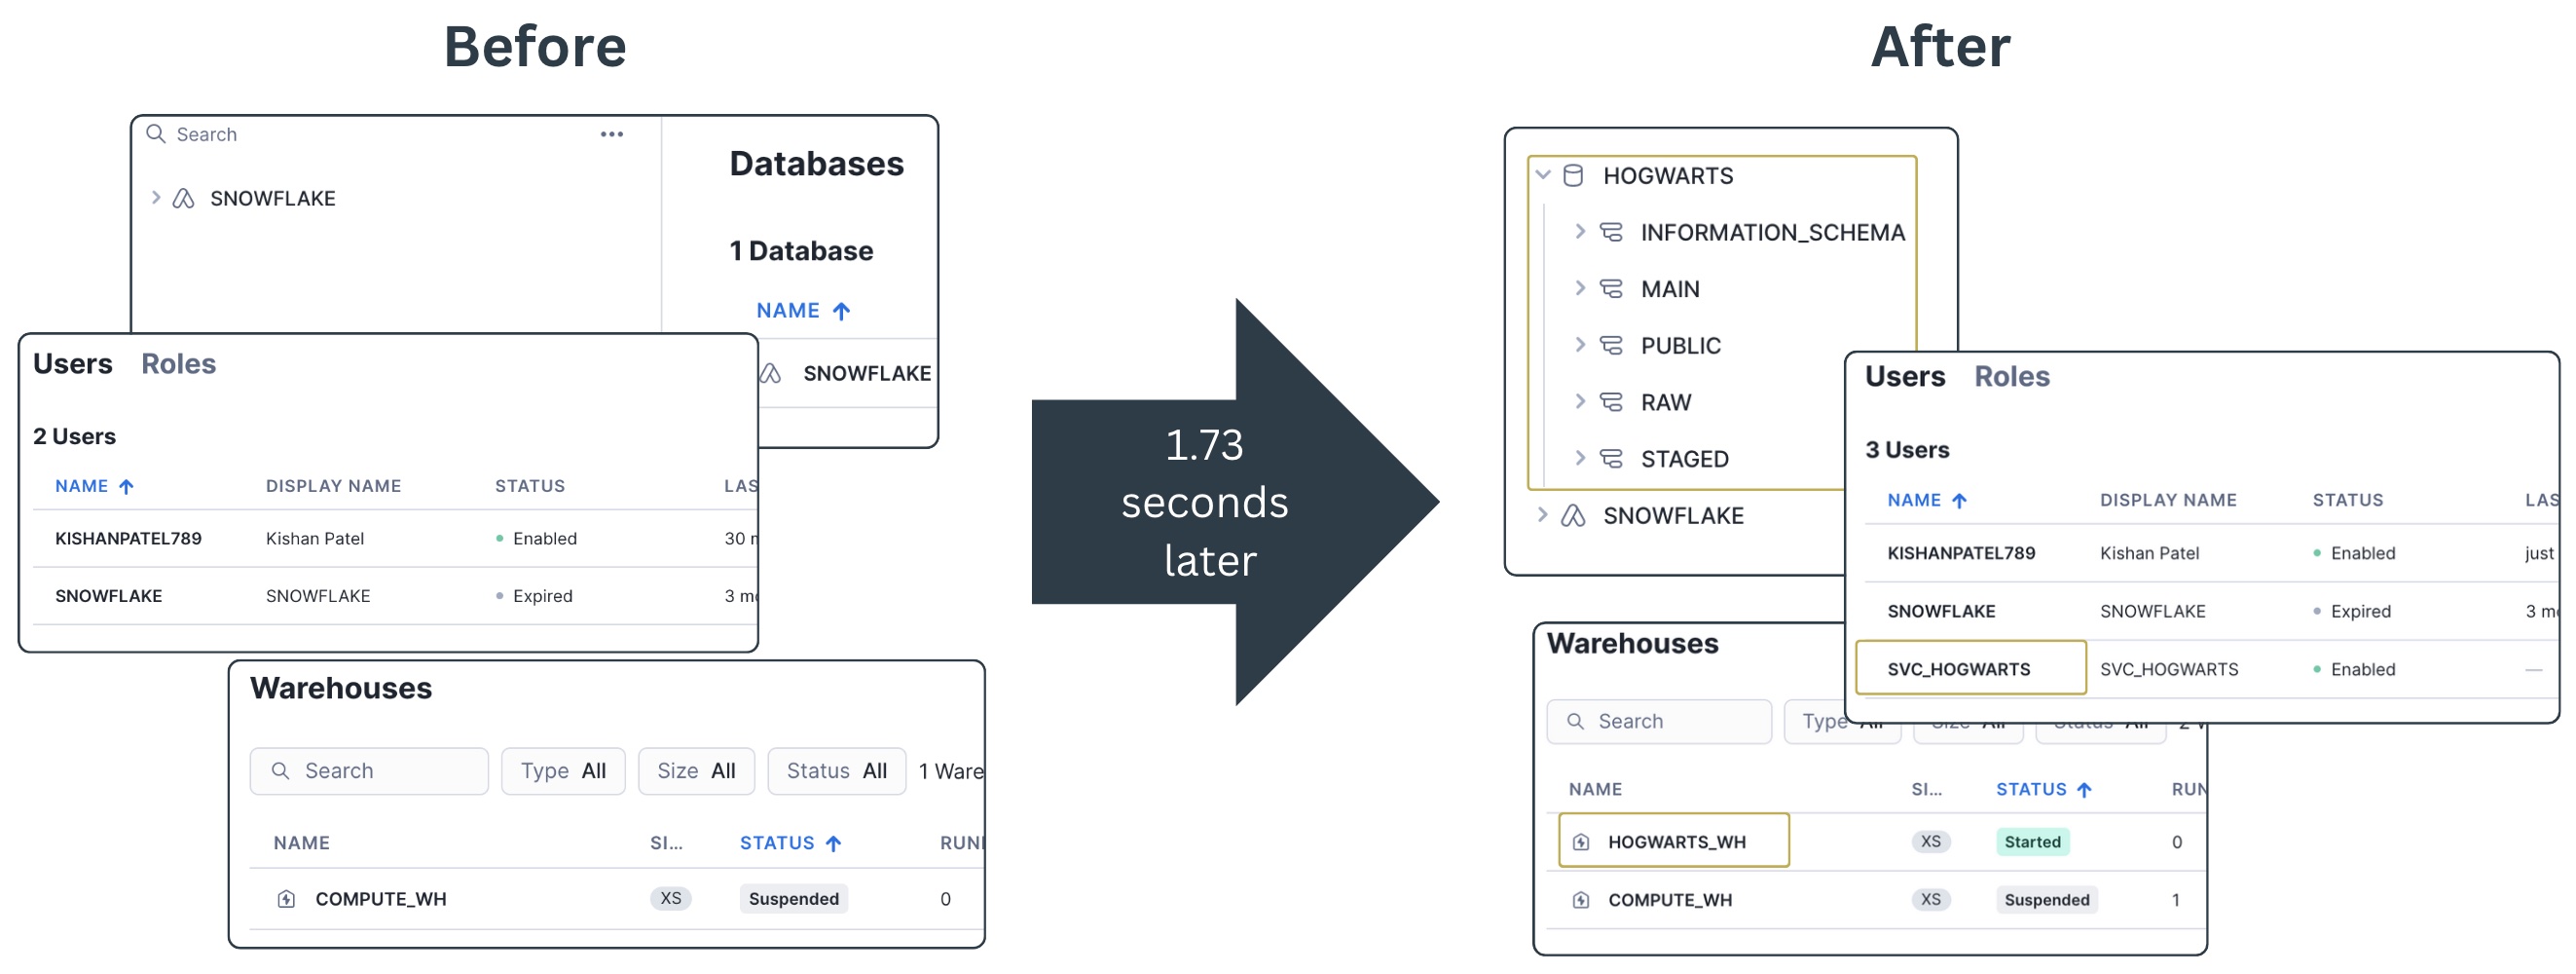
And boom! You have a database, three schemas, a service user, a virtual warehouse, and all the permissions needed created in 1.73 seconds.

Aside from writing the Terraform code, this approach of creating Snowflake resources is much faster than manually creating them through the UI.
Destruction of cloud resources is just as fast and can be executed with a destroy command: terraform destroy. As with creation, Terraform will prompt a list of all resources scheduled for destruction. You should read the list carefully before entering "yes". As the prompt wisely warns, "There is no undo."

And that's it! This code lets you to quickly spin up and tear down a working Snowflake warehouse. After your warehouse is set up, you can implement data pipelines to create tables and views within the three schemas. Destroying the resources via Terraform at the end of the day will ensure you do not pay for storage costs overnight. This framework makes it easier to play with Snowflake resources without stressing about running up a high bill because you forgot to shut down a VM. Feel free to steal the code for your next Snowflake adventure.